
After months of waiting The Great Australian Bake Off (GABO) has finally made it to our screens and in celebration I have decided to attempt each week’s technical challenge to see how I go. For those of you not familiar with the format, each week contestants on the show have to bake in three separate challenges:
- The signature bake (their own tried and tested recipe)
- The technical challenge where all contestants are given the same recipe (with limited detail) and ingredients
- And finally the show stopper, where each week they are asked to create something creative with wow factor.
One of the things I love about this show is that for two of the challenges, the contestants get to work off their own recipe which they know and have been able to practise. It is so important in baking to get the measurements/ratios right that it has always amazed me that people in other reality TV cooking shows can bake all manner of things from memory. I know that, even though I’ll often change things and add my own flair, in baking I still always start by looking at the recipe!
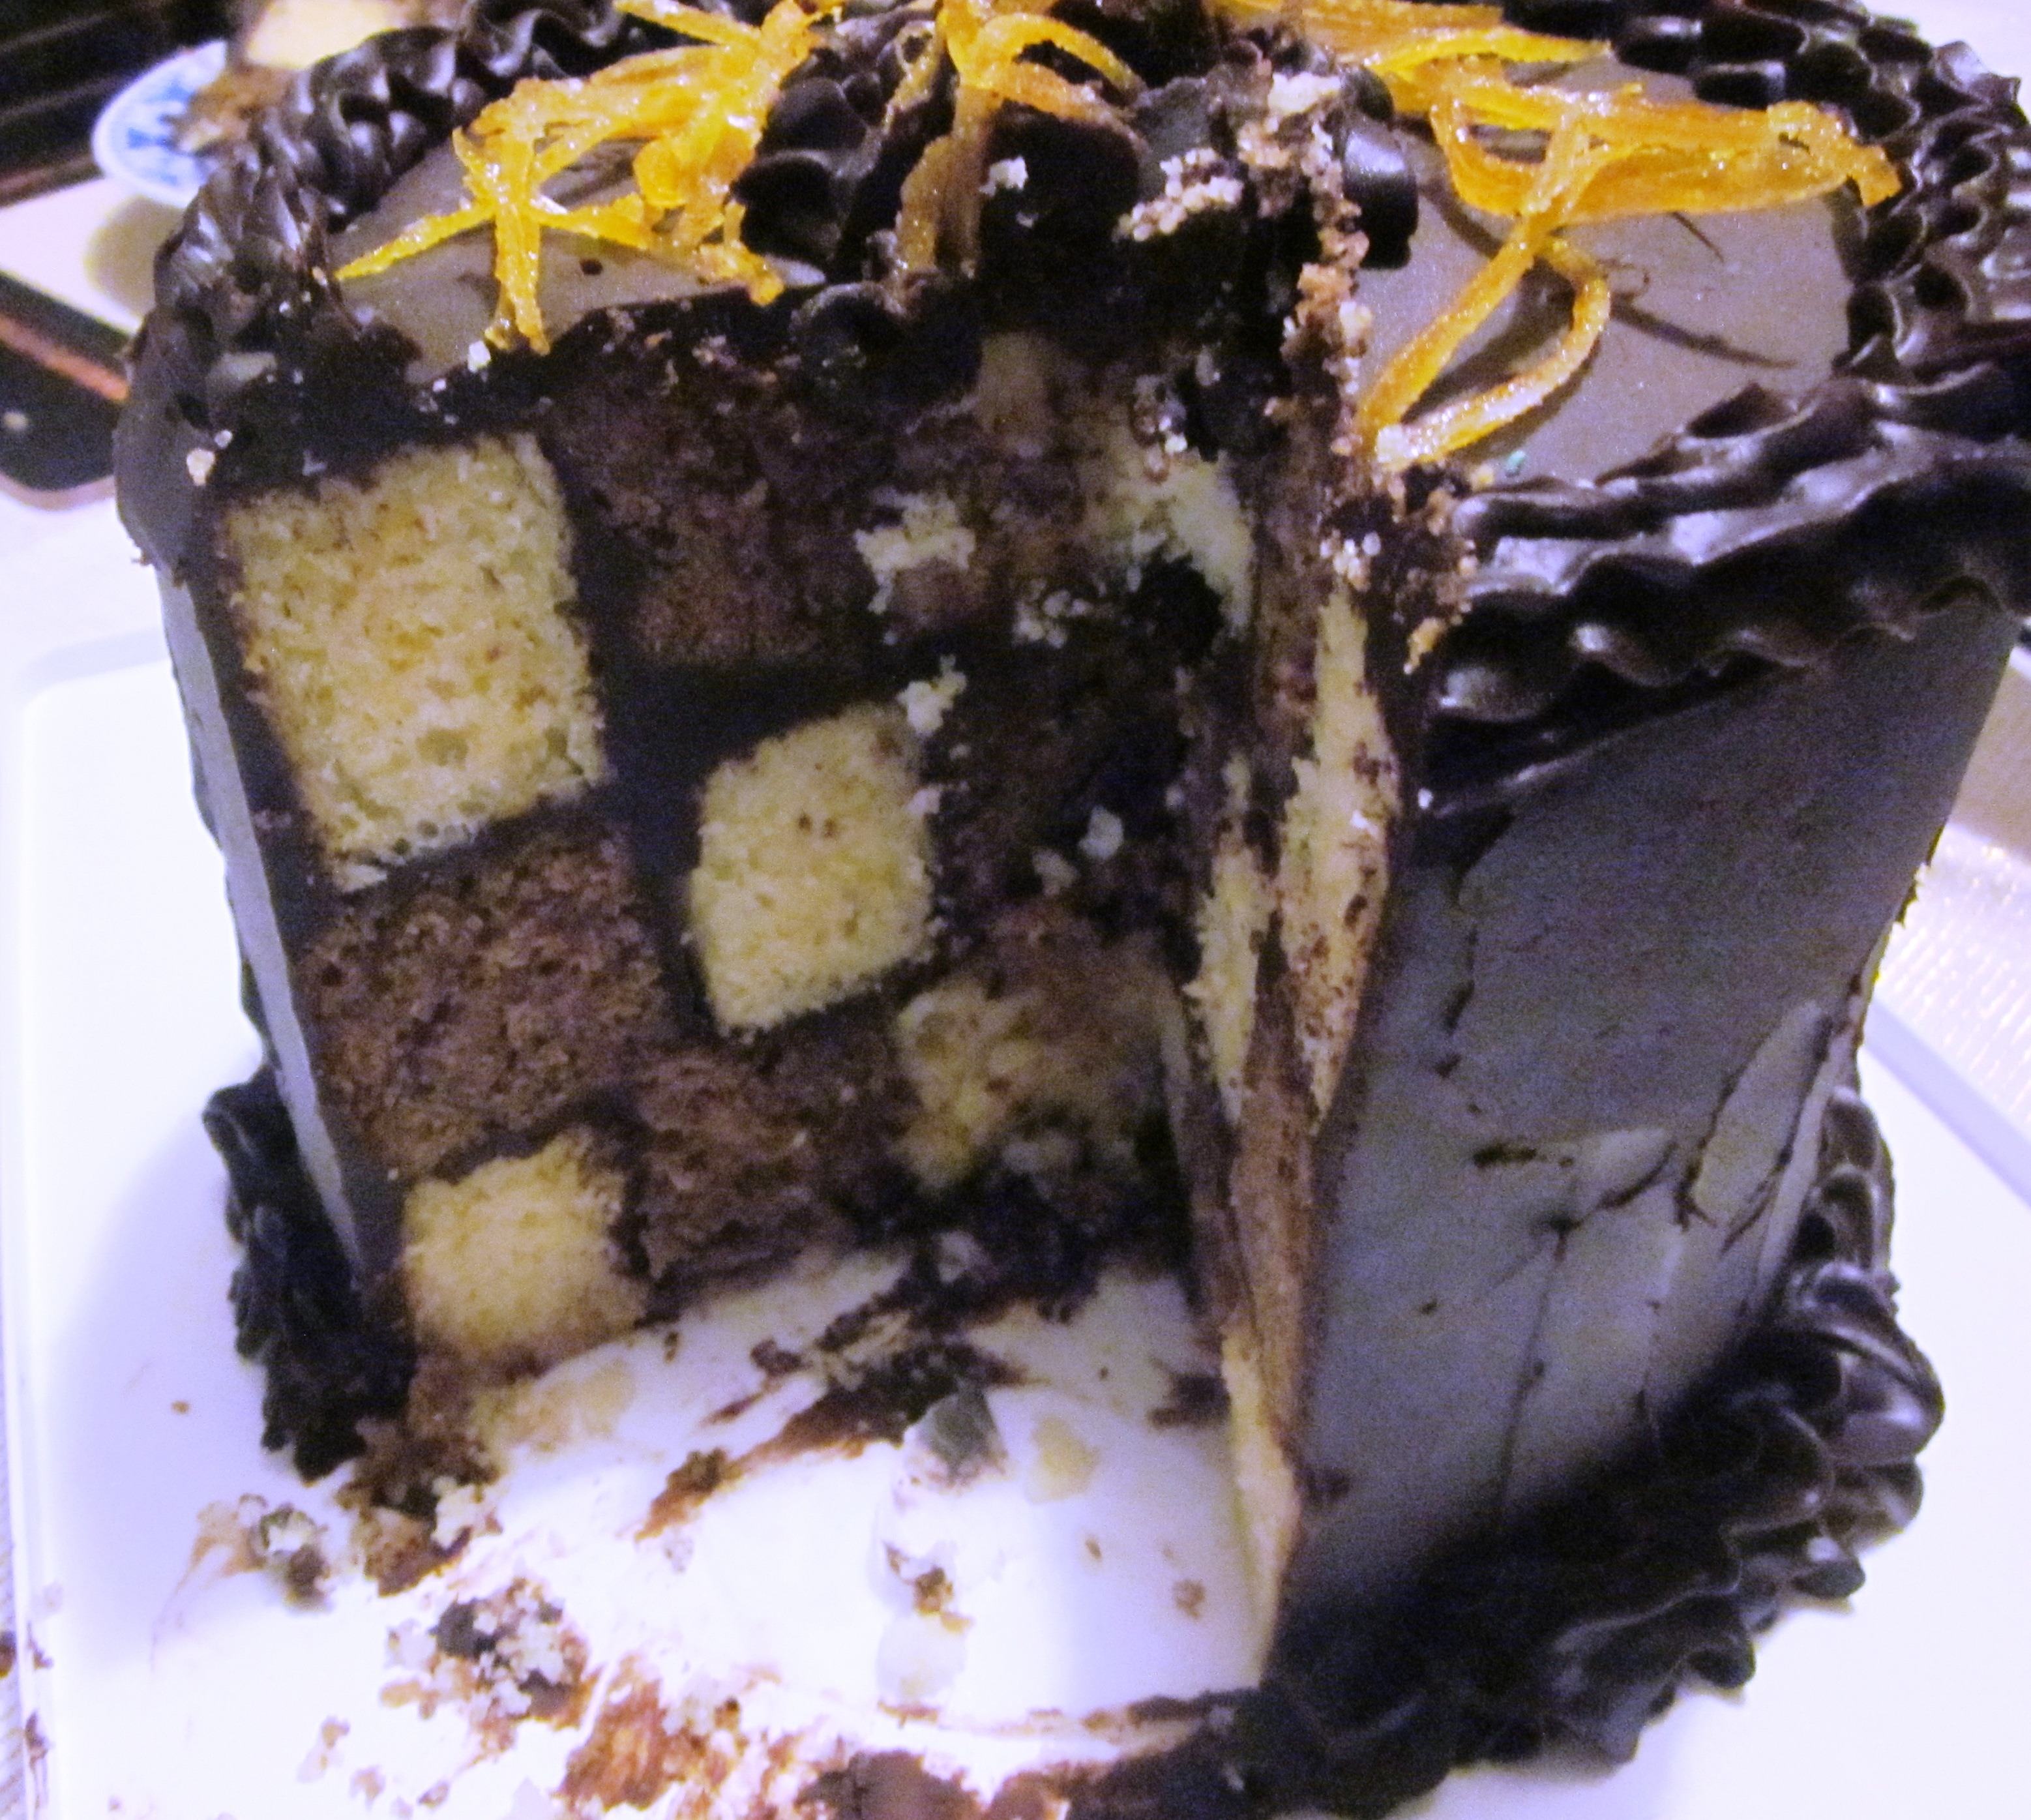
The technical challenge for week one was a chocolate and orange checkerboard cake and I just had to make it for my Dad’s birthday. The cake recipes themselves seemed quite easy, however my first hurdle was that I didn’t have the right sized tins (four 18 cm tins were required for this recipe). I managed to find one tin in a little homewares store down the road; however this meant that I had to cook four cakes separately rather than all at once. There was certainly no way I was going to be able to make this in the two hours the contestants had!
If you have the time, I would suggest making the cakes the day (or at least the morning) before you want to assemble them to allow them time to cool in the fridge (or freezer). They are much easier to cut and assemble cold (the first cake I made was a lot easier than the last, which was still slightly warm). I only made three rather than four levels as I had to transport it the next day (although you still need to make four cakes to get the desired pattern). And I also felt that the three levels was more than enough. This cake certainly has wow factor when you cut into it. I have to admit I was very excited when my Dad sliced the first piece and we could all see the checkerboard pattern inside!
I have to confess that, at the request of my Mum, I used my usual ganache recipe rather than the GABO recipe. . I also found I needed to use extra orange zest to get the level of flavour I was wanting. It is quite a rich cake and I would definitely recommend serving it with cream or icecream. But on the whole I have to say that my first technical challenge was a great success. On to the week 2 challenge!
GABO Chocolate and Orange Checkerboard Cake
Serves 12 – 16
You will need four 18cm round cake tins for this recipe (or one cake tin, however you will have to bake four cakes separately)
Ingredients
Orange cake
- 2 ½ cups self raising flour
- 1 ¾ cups caster sugar
- 3 eggs (59g eggs)
- 1 ¼ cups of milk (full cream)
- 100g unsalted butter – melted
- ¼ cup of vegetable oil
- Zest of 1 – 1 ½ oranges (I used 1 ½ as I like a lot of citrus flavour)
- 140m of fresh orange juice (1 found I needed 2 oranges to get this much)
- Red and yellow food dye to make orange batter (optional, I didn’t use it)
Chocolate cake
- 2 ¼ cups self raising flour
- ¼ cup of cocoa powder (dark such as dutch cocoa – don’t use drinking chocolate)
- 1 ¾ cups caster sugar
- 3 eggs (59g eggs)
- 1 ¼ cups of milk (full cream)
- 100g unsalted butter – melted
- ¼ cup of vegetable oil
- Zest of 1 – 1 ½ oranges (I used 1 ½ as I like a lot of citrus flavour)
- 140m of fresh orange juice (1 found I needed 2 oranges to get this much)
- A few drops of Parisienne essence to get a darker colour (optional, I didn’t use it)
Chocolate ganache
- 600ml thickened cream
- 800g dark chocolate (bits or chopped)
Method
To make the cakes
- Preheat the oven to 150C fan forced (170C). Line the base and sides of your tins with baking paper.
- Make the orange cake batter by combining all the ingredients together in a bowl and beating by hand or with a mixer until combined and glossy. Divide the mix evenly between two tins (or if you only have one tin like me, pour half the mix into the tin and keep the rest in the fridge until needed).
- To make the chocolate cake batter, combine all the ingredients in another bowl and again beat until glossy and then divide evenly between two more tins.
- Bake the cakes for 45-50 minutes (although some of mine took closer to an hour – it really depends on your oven) until the cakes are cooked (they will bounce back when pressed in the centre or a wooden skewer comes out clean). If cooking the four cakes at the same time, divide the cakes over two shelves and swap them around after 30 minutes.
- Once cooked, allow the cakes to cool slightly in the tins before removing and cooling completely on wire racks. If you have time, wrap in cling film and place in the fridge to chill once cool before you start the assembly.
Chocolate ganache
- Place the chocolate in a heat proof bowl and have a whisk or spatula ready.
- Place the cream in a saucepan and bring it to the boil until it reaches scalding point (when the bubbles start to rise quickly). Remove from the heat immediately and pour over the chocolate. Stir until combined and glossy.
- I prefer to allow the ganache to chill at room temperature rather than placing it straight in the fridge, as I find this gives a shinier finish. If making it in advance, allow to cool in the fridge and then remove a few hours before you need it and let it come to room temperature so you can work with it.
Assembly
- Trim the top of the cakes (using a long serrated bread knife or special cake cutter) so that they will all sit flat and are the same height.
- Make a template (see GABO template here) with a 6cm inner ring and a 12cm ring, with a small tab that measures to 18cm (the edge of the cake). What you want is a template you can use to divide each cake into three. A circle in the middle, and then two outside rings (6cm, 12cm & 18cm).
- Once you have made your template, secure it with wooden skewers and cut out the inner circle and two rings so that all of the cakes are divided into three parts.
- Now it is time to assemble. The aim here is to ‘swap’ the middle ring of each cake. The GABO instructions recommend starting from the inside out, but I found it easier to work from the outside in.
- Starting with the outside ring of one of the orange cakes, coat the inside with chocolate ganache and then place one of the chocolate middle rings inside. Coat the inside of this ring with ganache and then place one of the orange centre rings inside.

- Spread a layer of ganache over the top of the first cake, and then repeat this process but with the outside ring of one of the chocolate cakes first, an orange middle ring and then chocolate again in the centre.

- Spread a layer of ganache over the top and then repeat steps 5 and 6 until you have used all the cakes (or if like me you only want three layers, stop after the third). Note, for the last cake, turn the rings upside down when you assemble them so that the bottom of the cake becomes the top. This makes it easier to cover the cake with ganache and makes it smoother.

- Cover the top and sides with the remaining ganache. To get a smooth edge once covered, have a jug of hot water next to you. Dip a palate knife in the water, dry, and then smooth the ganache. Repeat until the cake is smooth.

- To decorate I piped the remaining ganache and decorated with candied orange zest*.
Source: GABO Chocolate and Orange Checkerboard Cake
Chocolate ganache recipe from Sarah Brigden (babyCakes)
* To make the candied orange zest, I placed thin slices of zest into a saucepan and covered it with water. Bring the water to the boil and once it is boiling, remove the zest. Cover with fresh water and bring to the boil. Do this three times in total. After the third time, drain the zest. In a small saucepan place some water and sugar (about 2 – 3 parts water to 1 part sugar), allow the sugar to dissolve over a low heat and then add the zest. Bring to the boil, reduce to a simmer and simmer for 10 – 15 minutes until the orange zest has softened slightly. Remove the zest and place it on a lined baking tray. Sprinkle with caster sugar and leave to dry.

very creative I like your cake 🙂
Thanks. I was very happy with the final result 🙂
you welcome 🙂 🙂
Thank you stopping by and visiting my blog too.
here my facebook page link you can check it out :
https://www.facebook.com/pages/Amalkitchen/148567981954576?ref=hl
Thanks again 🙂
The checkerboard cake was so delicious and looked amazing 🙂
Thanks Mum x